I built a power-efficient home server with Proxmox, optimizing performance while minimizing energy consumption. Here’s a brief overview of my hardware choices and the results.
Backstory
During my college years, I relied on cloud services to host my websites and game servers, but the monthly bills quickly became a burden—especially as I needed more resources like CPU cores, RAM, and storage. At $20/month for a basic setup, it wasn’t long before I started looking for alternatives.
That’s when I decided to build my own hardware. The goal? A server that could run around 10 VMs and services simultaneously, while being power-efficient enough to run 24/7 without racking up high energy costs. After a day of research, I found a solution: using a laptop CPU inside a regular PC mainboard. While not as powerful as desktop CPUs, these chips excel in power efficiency—perfect for a home lab server.
Why Power Efficiency Matters
If you’re a tech enthusiast like me, you know the thrill of building powerful setups for virtualization, development, or media storage. But running a server 24/7 comes with hidden costs—electricity bills. Reducing idle power consumption was a priority for me. I didn’t want my home lab consuming more electricity than a mining farm, nor generating enough heat to bring the Radiation Safety Committee to my door! The goal was simple: build a server that balances performance and energy efficiency.
Choosing the Right Hardware
The key to building an efficient Proxmox server starts with the hardware. After much research, I discovered the Intel Laptop chip mod, which, when used in a PC mainboard, has the lowest power consumption at idle. It’s perfect for a server that’s not constantly under load but needs to remain responsive when needed.
Checkout Linus’ video about this type of chip.
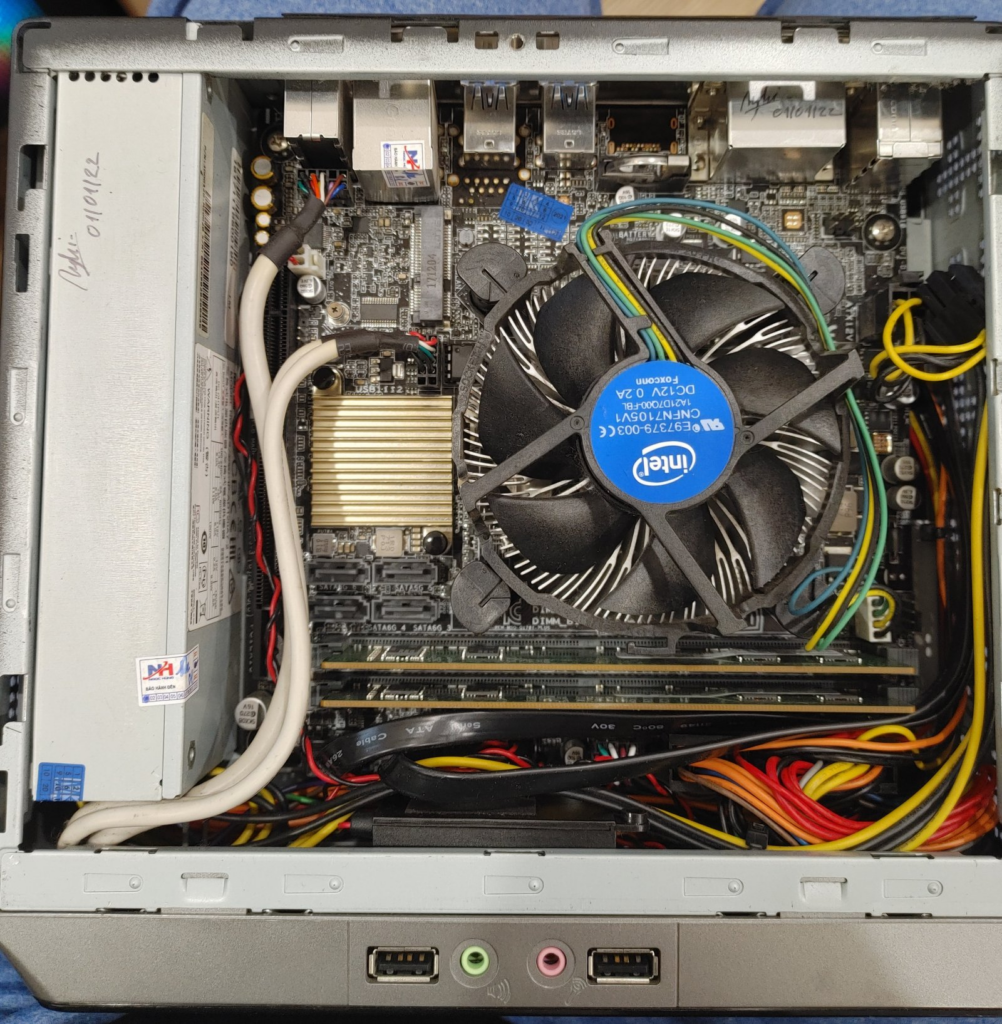
After much digging through forums, I found the perfect candidate for my needs: a mini PC with the Intel E-2176M chipset, priced at $160. (I bought this from a forum member VOZ.VN). A week after ordering, it arrived at my door, and aside from needing a storage and memory upgrade, it was just what I needed. Here’s the final hardware setup:

- CPU: Intel E-2176M ~ 6 cores, 12 threads—excellent performance for low power consumption.
- Motherboard: ASUS Q170i Plus, a mini-form-factor board with 6 SATA ports, ideal for a compact, energy-efficient build.
- RAM: Upgraded from 2x 4GB to 32GB DDR4, which is perfect for running multiple VMs and services.
- Storage: I added 2x 1TB Toshiba HDDs configured in RAID1 (disk mirroring for data redundancy) and a 256GB Samsung NVMe SSD for fast, responsive storage.
- Power Supply: A built-in 120W PSU, paired with a laptop-style power brick, providing great efficiency even at low loads.
Total cost? About $250 for the hardware—significantly cheaper than paying $100 monthly for a cloud setup with similar specs.
One note: I set up two 1TB HDDs, which might seem like it would create redundant data and waste power, right? Technically, yes. However, it’s definitely worth it because the data is invaluable, and the power consumption for both HDDs is only about 5W. Why would I sacrifice data safety for just 2.5W?
Disk mirroring, also known as RAID 1, is the replication of data across two or more disks.
techtarget.com
Disk mirroring ensures that there is at least one exact copy of the data at any given time in case of drive failure or other significant event.
Real-World Power Consumption
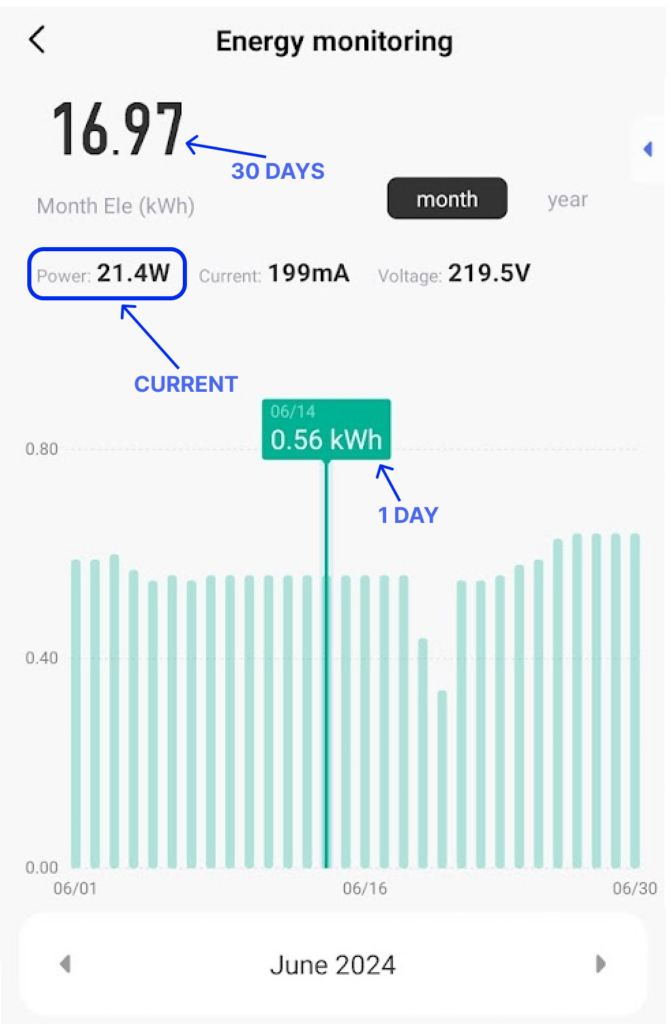
One of the most satisfying aspects of this project was seeing the results. My Proxmox server idles at around 22-23 watts, which is impressive given its powerful hardware. In comparison, typical home servers idle at 100-150W, meaning my setup is much more efficient, saving me significant money over time. The monthly energy bill for this setup is roughly $2—a fraction of what I’d pay for cloud services with similar specs.

Despite using the server for a variety of purposes—including hosting this blog, cloud storage, self-hosted services like Gitea and all others—power efficiency remains excellent, thanks in large part to the Intel Xeon E-2176M processor.
Lessons Learned and Final Thoughts
Building a power-efficient home server isn’t just about cutting utility costs—though that’s a great bonus. It’s about designing a system that’s cool, quiet, and capable of running 24/7 without overheating or causing noise issues. If you’re considering setting up your own server, my key advice is to prioritize energy-efficient components from the start.
The upfront investment pays off, both in long-term financial savings and reduced environmental impact. Whether you’re managing Proxmox, Docker, or a basic NAS setup, every watt saved makes a difference!
Have you built your own power-efficient home server? Share your experiences in the comments!


