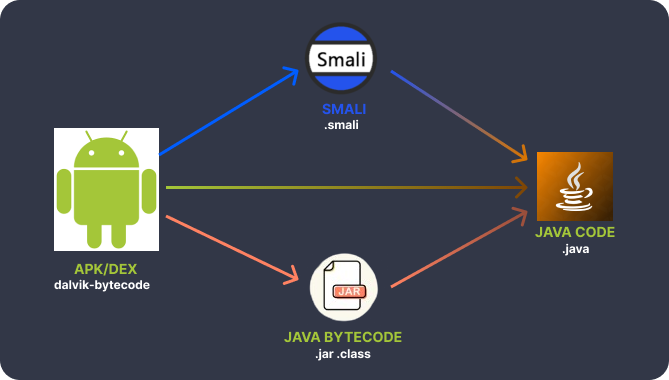
Reverse engineering Android applications can be a fascinating and insightful process, revealing how apps are built and function under the hood. This article explores the steps involved in transforming an APK file into Java source code and a Gradle project. My research into this area has spanned over two years, primarily focusing on decompiling APK files, analyzing their structure, and rebuilding them. Before diving into the details, check out this YouTube video on Reverse Engineering for a quick overview.
Disclaimer
Before proceeding, I would like to point out that reverse engineering software can have legal and ethical implications. Please always make sure you have permission to reverse engineer an application and that you comply with local laws and the application’s licensing agreements. This article is intended for educational purposes only, and any reverse engineering activities should be conducted responsibly and ethically.
The Process at a High Level

- Obtain the APK File: Acquire the APK file from various sources, such as APKMirror, your Android device, or even directly from the Google Play Store.
- Decompilation: Use a combination of tools to decompile the APK into Java code and extract resources like images, audio, layouts, and views.
- Reconstruction: Gather the findings and create a new Android project/Gradle project.
- Error Correction: Address any compilation errors, which are typically syntax or logic errors.
- Testing: Test the application thoroughly to ensure the decompiled code functions as intended.
Step-by-Step Guide
1. Grab the APK File
You can download the APK file from trusted sources like APKMirror or ApkPure.
2. Choose Decompilation Tools
Here are some recommended tools to facilitate the decompilation process:
- Recommended: Jadx – This tool can decompile APK files and export them as a Gradle project, minimizing manual work.
- Alternative: dex2jar or enjarify – Use these to convert DEX bytecode to Java bytecode, then decompile the resulting JAR file using a tool like JD-GUI.
- All-in-One Tools: ByteCodeViewer, JEB (commercial), or ApkLab, which is a VSCode extension that wraps around Jadx for added functionality, particularly useful for modifying logic.
3. Export the Project as Gradle
- If using Jadx, export the project directly as a Gradle project. You may need to adjust some configurations afterward.
- If not using Jadx, manually create a new Android project and organize your findings into the appropriate directories:
src/java,res/layout,res/drawable, etc.
4. Fix Compilation Errors
You might encounter various syntax and logical errors during compilation, such as:
- Using raw values instead of constants.
- Unreachable statements (loops and go-to).
- Incorrectly defined arrays, especially 2D arrays.
- Decompilation errors like missing variables or methods that couldn’t be decompiled.
While you can check and fix these manually, it’s often easier to compare with other decompiler outputs using tools like ByteCodeViewer or JEB.
5. Debugging Logic Errors
Resolving logic errors can be challenging, as the application may run but not perform as expected. Here are some strategies to tackle this:
- Review comments generated by Jadx or other decompilation tools.
- If issues persist, check the smali code and debug the APK behavior using additional tools like Ghidra, Jadx Smali Debugger, or JEB Debugging.
For further insights, you might find this video helpful: Do This When Your Android Decompiler Fails.
6. Final Verification
Thoroughly test the application to ensure it functions identically to the original. This process may involve numerous iterations of testing and debugging until you feel confident in its performance.
Sample Project: Decompiled Android Game 2048
This section illustrates the decompilation of the 2048 game APK and the conversion into a buildable Gradle Java project.
The source available at https://github.com/Huythanh0x/decompile_2048_apk_to_java

Steps:
- Grab APK File: Obtain the APK from the 2048 GitHub repository.
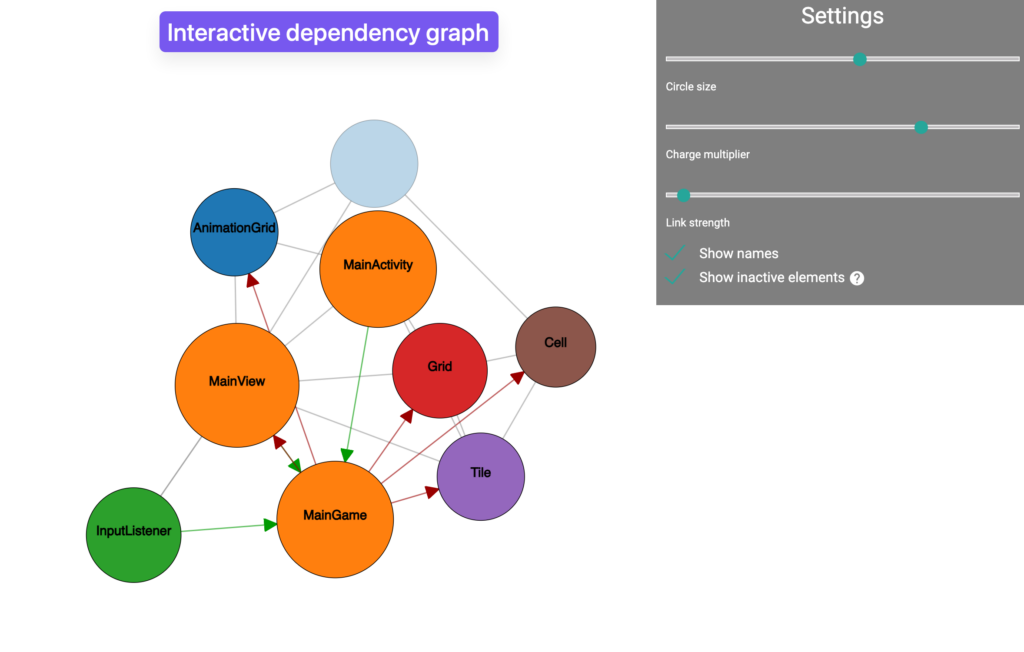
- Create APK Dependency Graph: Generate a dependency graph to understand the APK’s structure and class relationships.
- Export Project Using Jadx: Use Jadx for decompilation and exporting to a Gradle project.
- Import and Set Up: Open the project in Android Studio and set the necessary configurations.
- Update Environment: Adjust Java and Gradle versions, and compile SDK level.
- Remove Unnecessary Code: Eliminate support packages and redundant resources.
- Fix Errors: Resolve decompiler and logic errors using external tools as needed.
Tools Used:
- APK Dependency Graph: For visualizing class dependencies.
- Jadx: For decompiling and exporting the APK.
- Android Studio: For project setup.
- ByteCodeViewer: For bytecode analysis.
- JEB: For advanced decompilation and debugging.
Conclusion
Reverse engineering APK files to create Gradle projects is a complex yet rewarding endeavor. By understanding the tools and processes involved, you can gain valuable insights into Android development and application behavior. Whether you’re aiming to modify existing applications or just to learn, the skills you develop will be invaluable in the tech industry.

