Curious how Chrome extensions work, especially those with premium features? In this article, I’ll show you how to reverse engineer an extension, explore its structure, and unlock premium features—strictly for educational purposes!
Why Reverse Engineer Chrome Extensions?
There are several reasons you might want to reverse-engineer a Chrome extension. For me, it started with curiosity and a desire to enhance my development skills:
- Locally executed features: Many premium features in Chrome extensions don’t rely on external servers—they are executed right on your device. By modifying some checking logic, I could bypass restrictions and access those features for free.
- Understanding app logic: Especially in indie projects, where the developer might not have implemented complex obfuscation or security measures, you can often peek into how the app was built and functions. This insight is beneficial for my growth as an indie developer.
- Feature modification: I want to modify some logic or add small features to make the app more productive for me. For the sample I used in this article, I aimed to reuse the existing client extension and connect/store data to my own server/backup, giving me full control over my data.
So, let’s dive into how Chrome extensions are structured and how to explore them!
Understanding Chrome Extension Architecture
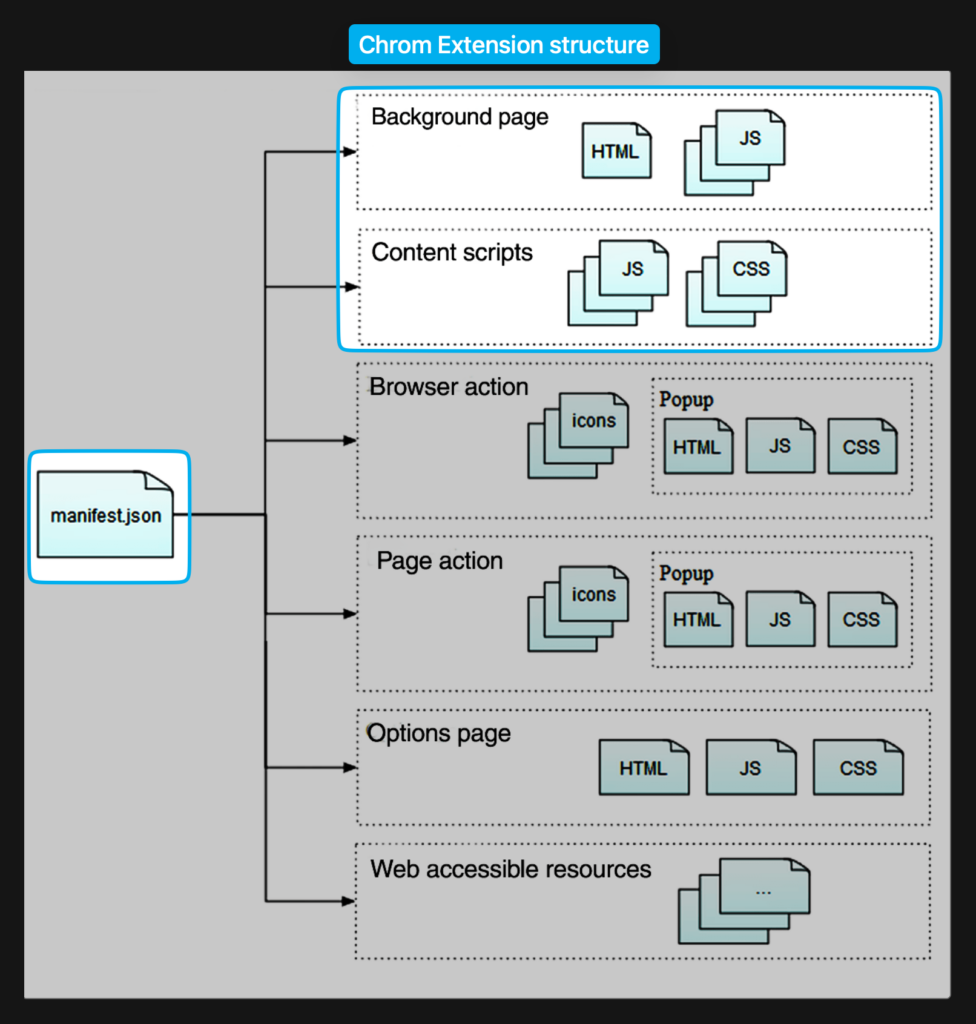
A Chrome extension typically consists of several important files, each of which plays a different role in the extension’s operation:
manifest.json: This is the core configuration file that defines the extension’s permissions, scripts, and components.content.js: This file contains JavaScript that interacts with the web pages you visit.background.js: This is a background script that runs in the extension’s isolated context and handles events that are independent of web pages (e.g., handling requests, setting up alarms, etc.).
Here’s a simple diagram to help you visualize this:

Now that we know the structure, let’s break down the process of reverse engineering an extension.
Steps to Reverse Engineer a Chrome Extension
Step 1: Download the .crx file
You can download the .crx (Chrome extension package) from the Chrome Web Store or any third-party software store. This file is the built file and contains all the resources you need to run the extension.
Step 2: Extract the .crx to a .zip
After downloading the .crx file, the next step is to convert it into a .zip file so that you can explore its contents. Various tools online allow you to convert .crx to .zip. I used the website download crx for both crx and reverse crx to zip file.
Step 3: Load the unpacked extension
Once extracted, load the unpacked extension in Chrome. This step allows you to run the extension locally, enabling you to experiment with it. The code you have should work identically to the original one.
Step 4: Explore the code
Now, it’s time to get your hands dirty. Open the files in your favorite IDE (I personally recommend WebStorm) and start exploring. You can rename variables and add comments to functions to better understand the flow and structure.
Tip: The extension I reverse-engineered had three separate environments: dev, prod, and local, allowing the code to switch between different setups depending on the situation.
A Bit About the Sample Extension – WebHighlights PDF
Web Highlights is a popular Chrome extension that enables you to highlight websites.
In a nutshell, Web Highlights lets you highlight text anywhere and organize your research efficiently. It’s developed by an indie developer and applies a freemium model, allowing you to use the app for free. Additionally, there is a premium/ultimate plan for extra features (highlighting images, syncing highlights between apps, and integration with tools like Notion).
Interesting Findings During Reversing
Here are some notable things I found while reverse-engineering this particular Chrome extension:
1. Test Account for Production Environment
In earlier versions of the extension, I found a test account with production access rights in the extension’s resources. This has since been removed, but it was an interesting insight into how developers sometimes leave sensitive information exposed.
2. Locally Executed Premium Features
Most of the premium features were executed locally, meaning I didn’t need to do much work to bypass some checking flags for premium features. This allowed me to modify the code and simulate being a premium user indefinitely, as the extension could work independently without the backend.
3. Requests Do Not Check Authentication
Usually, accessing a specific API would require special permissions, restricting users based on their roles (for example, Free Users cannot sync data, but Premium users can). However, with the current implementation on the backend, it does not check. So if I can bypass and pretend to be a Premium user with a few code modifications, I could access all premium features (syncing, image highlights, exporting to Notion, etc.).
4. Modifying JWT Token to Bypass Checking Logic
The user type and plan expiration date were stored directly within the payload of the JWT token. Early users (before May 2023) even had lifetime access to features like syncing. By modifying the JWT token, I was able to give myself access to all premium features.

5. Code Snippets for Premium Access
Here’s an example of a code snippet that I found particularly useful for tweaking the premium status:
var PlanTypeEnum = (planType => (
    planType.OFFLINE = "OFFLINE",
    planType.FREE = "FREE",
    planType.FREE_TRIAL = "FREE_TRIAL",
    planType.PREMIUM = "PREMIUM",
    planType.ULTIMATE = "ULTIMATE",
    planType
));

subscriptionDuration = (t => (
	t.ONE_MONTH = "1M",
	t.ONE_YEAR = "1Y",
	t.LIFETIME = "Lifetime",
	t
));
The PlanTypeEnum and subscriptionDuration variables provide insight into the different plans the app offers, allowing me to set my account to whichever I want. For example, I could simulate being a lifetime premium user.
Here’s another example where I modified the logic to force the extension to think the plan never expires:
get currentPlanExpired() {
    return false;  // Always return false, indicating the plan is active
}

function realDayLeftInUserPlan(e) {
    return 999999;  // Set an incredibly high number to simulate an unexpired plan
}
To top it off, I modified the function that calculates the number of days left in the user’s plan:
get currentPlan() {
    return User.USER_PLAN_TYPE.ULTIMATE; // Quick return the type to Ultimate
}

function getActivePlanForUser(e) {
    return fh.ULTIMATE; // This function is used for most of the app, so modifying the returned value here is a perfect place.
}
What Did I Gain?
By following these steps, I was able to unlock lifetime premium access, even for features that required backend support. Here’s a breakdown of what you can achieve by modifying just a few lines of code:
- Unlimited Premium Features: You can have premium features like syncing across devices and highlighting images without needing to pay or renew the plan.
- No Plan Expiry: Since the JWT token stores the user type and expiration date, modifying it directly allowed me to set the expiry date to never.
Legal and Ethical Considerations
Before you rush to try this on your favorite extension, it’s important to discuss the legal and ethical implications. Reverse engineering an application, especially for the purpose of bypassing premium features, may violate the terms of service of the app and could have legal consequences. This article is intended purely for educational purposes. Always ensure that you have permission from the developer or are conducting this on your own software to avoid infringing on any rights.
Conclusion
Reverse engineering a Chrome extension offers fascinating insights into how features are implemented and how security measures (or lack thereof) are built. While this exercise has practical benefits, such as unlocking features or understanding app logic, it also highlights the importance of securing applications properly. Developers should be mindful of where they store sensitive information like JWT tokens and ensure backend validation for premium features.
If you’re interested in diving into the world of reverse engineering, start with something simple like a Chrome extension, but always be aware of the ethical boundaries.
Happy coding!


